ZOLL emsCharts RescueNet Billing Interface
What is it?
The ZOLL emsCharts RescueNet Billing Interface is an integration between ZOLL emsCharts and RescueNet Dispatch and Billing (RNDB). This integration uses the RescueNet (RN) ePCR Import Web Service to import data from ZOLL emsCharts into RNDB and Billing Pro. The RN Import Web Service runs on the RN ePCR web server that is owned and maintained by your agency or parent company, or is hosted by ZOLL. The Import Web Service follows the NEMSIS-defined pattern for receiving NEMSIS 3.4 formatted files to import into RNDB. It can receive both demographic dataset files used for configuration of the system, and EMS dataset files which contain the details about a specific patient encounter.
This integration is for services that use ZOLL emsCharts to document patient encounters and use RescueNet Billing or Billing Pro for billing purposes. It is important not to confuse this interface with the other ZOLL emsCharts to RNDB solution that uses the Remote Downloader and NEMSIS Trip Import to export chart data from ZOLL emsCharts and import it into RNDB.
Note: This interface is completely separate from the NEMSIS Trip Import integration.
Use these links if you wish to jump to a specific topic.
Pre-requisites
-
ZOLL emsCharts
-
RNDB 4.8.2
-
RN ePCR 6.6 with Service Pack version 2+ (6.6.X versions only, not 6.7)
-
Important! RN ePCR 6.7 is NOT currently supported but we are working on implementing the latest changes to the interface so it will be compatible with 6.7
-
Web server with a non-temporary security certificate if your RN ePCR system is not hosted by ZOLL
-
ZOLL emsCharts IP addresses must be whitelisted for your RescueNet web server to ensure connections are not rejected or blocked. Please consult with your ZOLL implementations specialist or ZOLL support for details.
-
Common terms
-
ZOLL emsCharts RescueNet Billing Interface: The name of this integration.
-
RNDB to ZOLL emsCharts Integration: Integration that sends CAD data from RescueNet Dispatch to ZOLL emsCharts. This integration is separate from and not required for the ZOLL emsCharts RescueNet Billing Interface that this topic covers.
-
RescueNet Import Web Service: The primary workhorse for the integration interface. The Import Web Service receives NEMSIS data from ZOLL emsCharts and imports it into RNDB.
Note: The RN Import Web Service application will show up in Internet Information Services Management console on the web server as 'ZOLLPCRIMPORTWEBSERVICE' and you may hear it referred to as PCR Import Web Service or similar variations.
-
RescueNet Administration (RN Admin): Administration tool for RNDB and some RN ePCR configurations.
-
Field Data Administration (FD Admin): One of two administration tools for RN ePCR.
-
ZOLL Data Management Console (ZDMC): One of two administration tools for RN ePCR.
-
RescueNet Administration workstation (RN admin workstation): A workstation that has RescueNet Billing and RescueNet ePCR administration tools (RN Admin, FD Admin, and ZDMC) installed.
-
RCSQL database (RCSQL): The primary database where all the RNDB and RN ePCR configurations are stored. RNDB trip data is also stored here as well as the chart and demographic data imported from ZOLL emsCharts.
Architecture
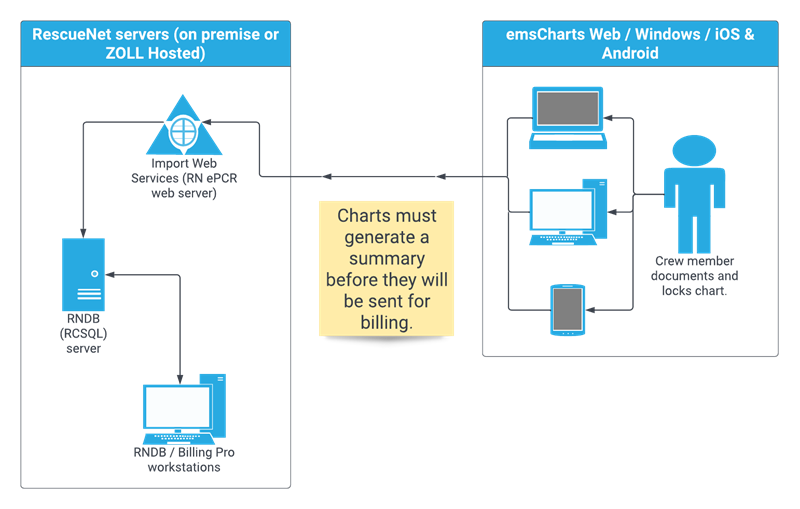
Your crews will document their charts and lock them as normal. Once your charts move to a QA level that triggers a chart summary generation, the data will send to the RN ePCR Import Web Service which will process and import the data into the RCSQL database so it is accessible in RescueNet Billing and Billing Pro.
Installation
Please contact ZOLL Support if you need the installation files for the ZOLL emsCharts RescueNet Billing Interface, RNDB, or RN ePCR.
Important! Before proceeding you must read the following:
-
You must already have a fully installed and configured RNDB and RN ePCR environment.
-
A fully configured RN ePCR environment will have a RN Import Web Service on the web server but the ZOLL emsCharts RNDB Interface must still be installed because it adds additional functionality to the Import Web Service that allows it to properly translate and import the NEMSIS data from ZOLL emsCharts. NEMSIS data will not sync from ZOLL emsCharts to RNDB without installing the interface and properly configuring the systems.
-
If the RN Import Web Service is already installed, the ZOLL emsCharts RNDB Interface installer will upgrade it.
-
A security certificate must be created for your web server to use for the RN Import Web Service.
-
ZOLL emsCharts IP addresses must be whitelisted for your RescueNet web server to ensure connections are not rejected or blocked. Please consult with your ZOLL implementations specialist or ZOLL support for details.
Steps to install
The installation should be done by your IT administrator.
-
Run the "EmsCharts RNDB Integration Setup" installer file for the version of RN ePCR you are currently on.
-
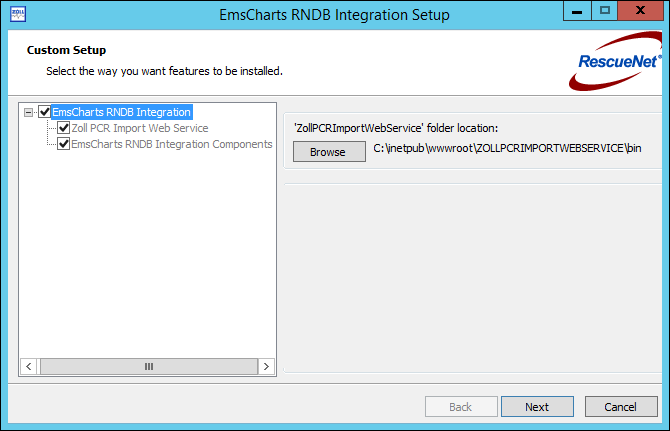
Make sure both the "Zoll PCR Import Web Service" and "EmsCharts RNDB Integration Components" checkboxes are selected and click Next.
-
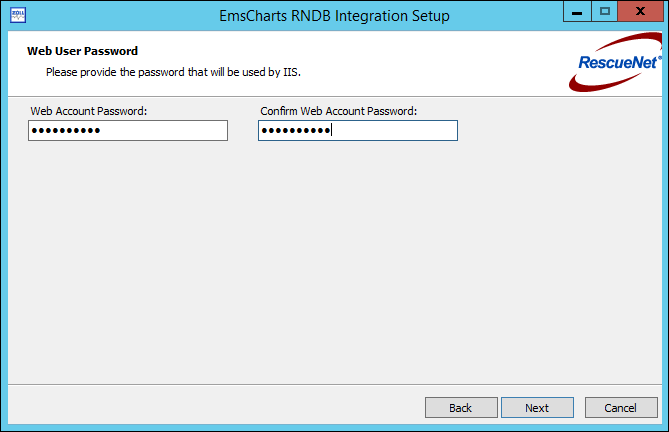
Enter the password for the 'ePCR_Suite_IIS' user and click Next.
Note: This is a local account that was used to install the RN ePCR web components. It may have a different name in your system.
-
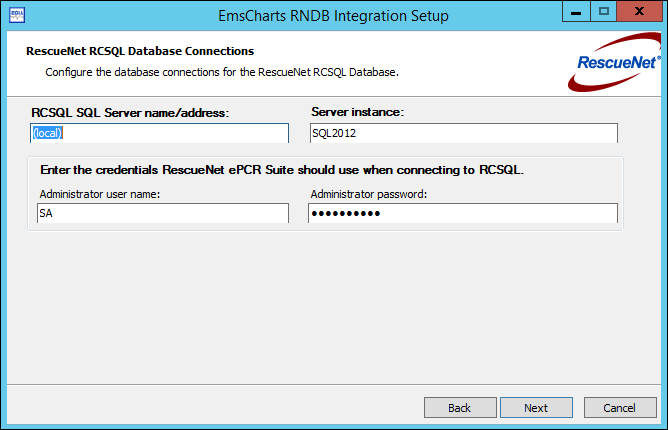
Enter the server name, instance name, and user name and password for your RCSQL database connection and click Next.
-
Click Install and the installation will run.
-
Click Finish to close the installer once it completes.
Setup
The setup consists of some configurations that are usually done once and rarely, if ever, changed - we'll refer to these as the initial configurations. There are other configurations that need to be updated on a more regular basis - we'll refer to these as maintenance configurations. The following information assumes most basic Service configurations have already been done, including NEMSIS export settings, Service demographics, and QA level workflow.
Click the configuration options below to expand.
The following configurations are typically only done once and rarely, if ever, changed.
-
Important! Contact ZOLL Support to request the billing web service be setup for your ZOLL emsCharts service. The billing web service configurations are not accessible by customers. This is typically done by ZOLL during the implementation of your system, but if you are switching billing companies, migrating your on premise servers, changing web security certifications, changing domains, or modifying anything else in your environment that changes the Import Web Service hosted on your RN ePCR web server, you will need to provide ZOLL Support with the new Import Web Service endpoint address so they can update your ZOLL emsCharts billing web service configuration.
-
Attachment categories: Choose which attachment categories you want to send to RNDB in the Chart Attachment Categories code table.
Notes:
-
Skip this step if you are using the Remote Downloader's Trip Attachment Transfer option to transfer attachments to RNDB. If you use both options, you will receive duplicate trip attachments in RNDB.
- Click here for full instructions and field descriptions when adding/editing chart attachment categories.
-
In Service Configuration > Code Tables > Chart Attachment Categories, select the categories for attachments you wish to send to RNDB and set at minimum, the following configurations:
-
Send to: Billing: Set to 'Yes'.
-
NEMSIS3 Document Type: Choose the NEMSIS v3 attachment type.
-
NEMSIS Billing V3: Set to 'Yes'.
-
Make sure to click SAVE for each category before moving on to the next one.
-
-
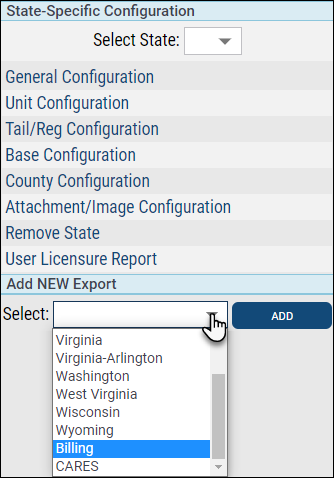
Billing export settings: In Service Configuration > Export, use the State-Specific Configuration > Select State drop-down to see if there is a "BILL" option. If there is, you may already be exporting to a billing company and these settings will affect all billing exports.
-
If the "BILL" option does not exist, proceed to step 3.a below.
-
If the "BILL" option already exists but you are not exporting to another billing company, proceed to step 3.b below.
-
If the "BILL" option already exists and you are exporting to another billing company, review the configurations for steps 3.b, 3.c, and 3.d below. If any of the configurations are different from your current BILL export settings, STOP! Contact ZOLL Support. Changing settings for an existing live billing export will impact your billing.
-
-
Under the Add NEW Export > Select drop-down, choose the 'Billing' option and click ADD. This will add the "Bill" option to the Select State drop-down.
Note: For more information on configuring your exports, review the Setting Up Your State and Billing Exports topic.
-
Select BILL under State-Specific Configuration > Select State.
Note: If you just added the Billing (BILL) export to your service, make sure to review and configure each applicable setting for all configuration categories: General Configuration, Unit Configuration, Tail/Reg Configuration, Base Configuration, and County Configuration.
-
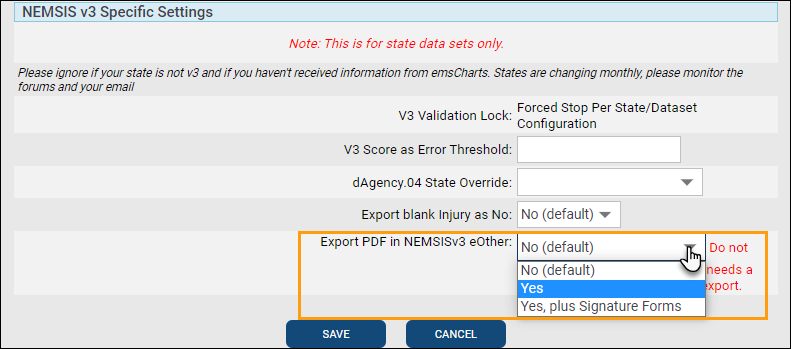
Click General Configuration and under NEMSIS v3 Specific Settings, set 'Export PDF in NEMSISv3 eOther' to 'Yes' or 'Yes, plus Signature Forms' then click SAVE.
Important! If your service is already using Remote Downloader to send a copy of your charts as a PDF attachment, enabling this option will cause duplicate trip attachments in RNDB.
-
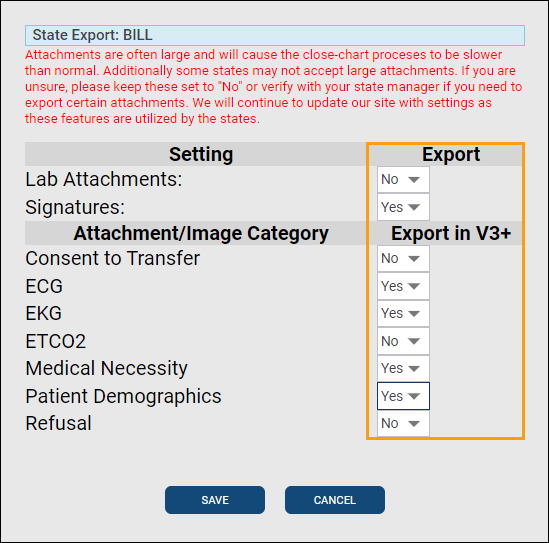
Click Attachment/Image Configuration and set each attachment option and category you want to send to RNDB to 'Yes', then click SAVE.
Important! If your service is already using Remote Downloader to send attachments to RNDB, enabling attachments for billing exports will cause duplicate trip attachments in RNDB.
-
Procedures for NEMSIS export: Go to Service Configuration > Chart and under the Page 8 section, set NEMSIS 3 Procedure Select Box to 'Yes' and click SAVE.
-
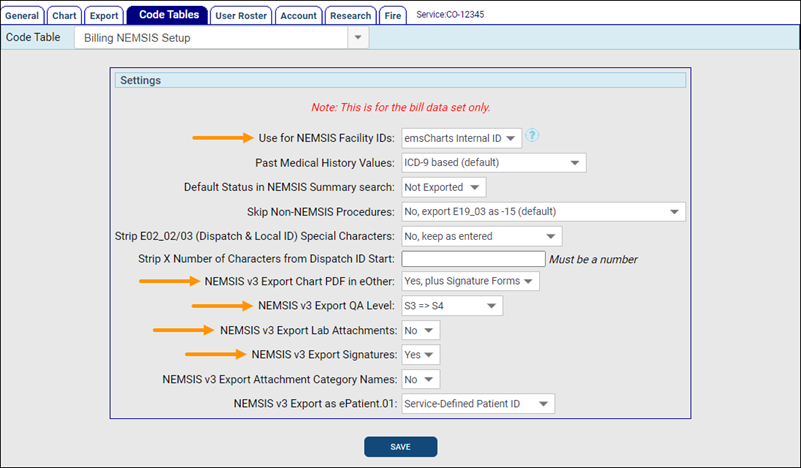
Billing export settings: Go to Service Configuration > Code Tables > Billing NEMSIS Setup to configure the fields below. Click SAVE when finished.
-
Use for NEMSIS Facility IDs: Set to 'emsCharts Internal ID'.
-
NEMSIS v3 Export Chart PDF in eOther: Set to 'Yes' or 'Yes, plus Signature Forms' if your service is not using Remote Downloader to send a PDF copy of your charts to RNDB.
-
NEMSIS v3 Export QA Level: Choose the QA level at which your charts should send to RNDB. This should be the same or after the QA level set for the Generation QA Level field in step 6 below.
-
NEMSIS v3 Export Lab Attachments: Set to 'Yes' to send lab attachments to RNDB if your service is not using Remote Downloader to send them. This setting is optional for the ZOLL emsCharts RescueNet Billing Interface.
-
NEMSIS v3 Export Signatures: Set to 'Yes' to send signatures to RNDB. This setting is optional for the ZOLL emsCharts RescueNet Billing Interface.
-
-
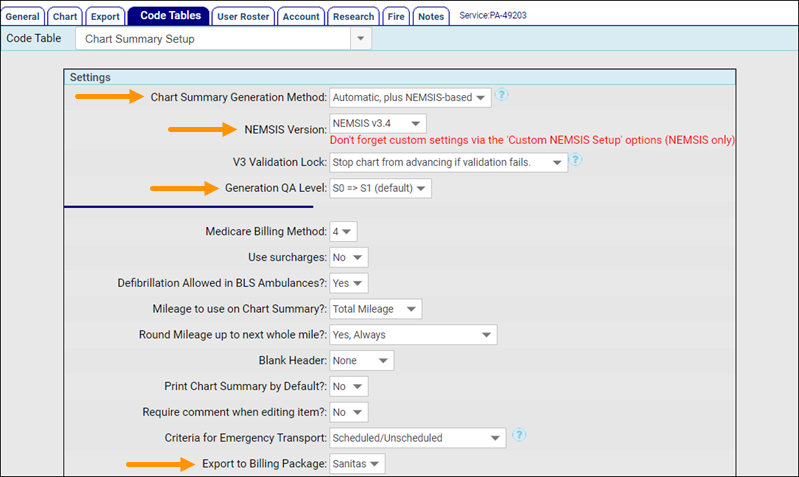
Chart summary generation: Go to Service Configuration > Code Tables > Chart Summary Setup and configure the fields below. Click SAVE when finished.
-
Chart Summary Generation Method: Set to 'Automatic, plus NEMSIS-based'.
-
NEMSIS Version: Set to 'NEMSIS v3.4'.
-
Generation QA Level: Choose the QA level at which your charts should generate the NEMSIS file that will be sent to RNDB. This should be the same or before the QA level set for the NEMSIS v3 Export QA Level field in step 5 above.
-
Export to Billing Package: Set to 'Sanitas'.
-
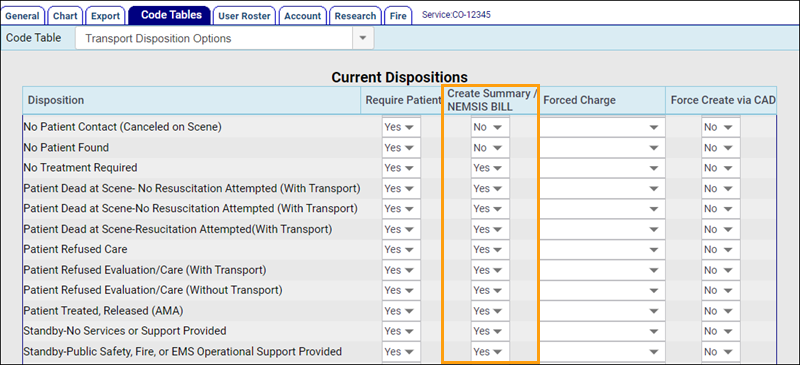
Transport dispositions to send to billing: Go to Service Configuration > Code Tables > Transport Disposition Options to review and confirm your billable transport dispositions. For each transport disposition that should be sent to RNDB, set the 'Create Summary / NEMSIS BILL' drop-down to 'Yes' and click SAVE.
Note: Changing this setting will not affect any existing charts that have already passed the QA level configured for your billing exports in step 5. Any existing charts that need to be sent to RNDB but had a transport disposition not configured to send to billing, need to be manually demoted and then re-advanced through QA to the level set for exports once the 'Create Summary / NEMSIS Bill' setting is changed to 'Yes'.
-
NEMSIS v3 reports: Go to Service Configuration > Code Tables > Global/System Reports, check the box for 'Global: NEMSISv3' and click SAVE.
-
State ID: Make sure your service's state ID matches between ZOLL emsCharts and RNDB.
-
In ZOLL emsCharts go to Service Configuration > Export > Select State drop-down and choose the headquarter state of your agency. This will be the state listed in Service Configuration > General. With your state selected, click General Configuration and note the value in the State ID field.
-
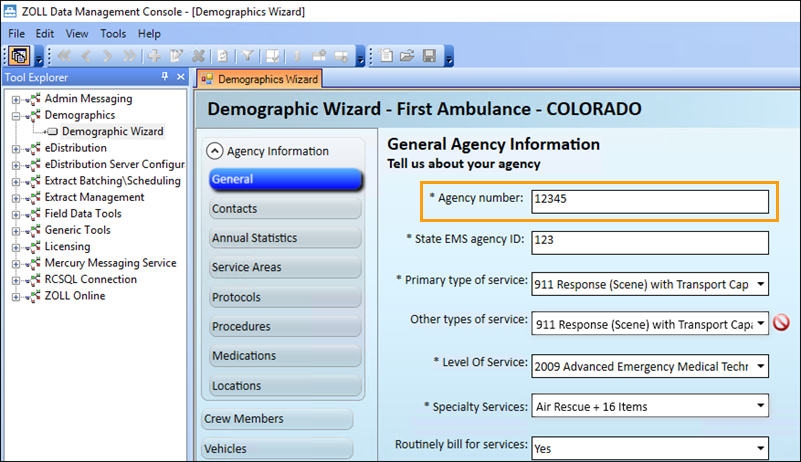
On a RN admin workstation in your RescueNet system, launch ZOLL Data Management Console (ZDMC) and go to Demographics > Demographic Wizard and choose the state of your agency's headquarters. On the General tab, compare the value in the 'Agency number' field with that from the State ID field in ZOLL emsCharts. The values should match.
Note: If the ZOLL emsCharts state ID and RN ePCR agency number do not match, data will still be imported into RNDB but will not be associated with a company and will not be viewable.
-
-
RNDB signature type mappings: Although the RN ePCR system has a set of default signatures out of the box, we recommend reviewing them to ensure they are setup properly for your service since they will affect how your NEMSIS signature data is imported into RescueNet Billing.
-
On a RN admin workstation, launch RescueNet Administration and go to Field Data > Field Data Configuration > [click OK on the warning] > Data Entry Wizards > Signatures > Signature Types and Disclaimers.
-
For each signature type, select it and click Edit then click Signature Reasons.
-
Each signature reason must be mapped to one, and only one, signature reason so the interface can import signature reasons sent from ZOLL emsCharts to the correct signature type in RNDB. Select the signature reason and use the arrow buttons to move it to either the Include or Exclude column. Signature reasons that are not mapped to a signature type will be ignored during the import into RNDB.
Notes:
-
The disclaimer text from RN ePCR will not be used since the actual disclaimers are configured and displayed in ZOLL emsCharts.
-
While editing the signature types, you can use the boxes for 'HIPAA Signature Type' and 'HCFA (Box 12 & 13) Signature Type' to designate a signature type for those purposes, if applicable.
-
-
Click OK > OK to save the configurations.
-
Click Done once you have finished reviewing each signature type.
-
Click Update then click Yes.
-
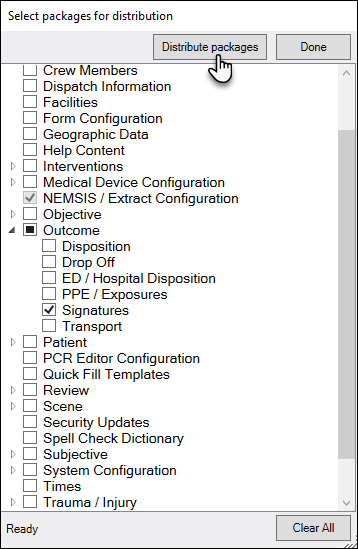
Check the Outcome > Signatures box.
-
Click Distribute packages.
-
Click Done.
-
You can now close Field Data Administration and RescueNet Administration.
-
The following configurations are for items that change on a more regular basis and require their ZOLL emsCharts selection lists be updated. These items are your agency's crew members, units (vehicles), and facilities (common addresses and hospitals).
Since these configuration selection lists must match between ZOLL emsCharts and RescueNet, there is a demographic sync feature that allows crew members, units, and common addresses and hospitals from ZOLL emsCharts to be sent to RescueNet in the form of a demographic file so that the information is either automatically created in RescueNet, or updated if it already exists. While the ZOLL emsCharts demographic information can automatically update RNDB on a scheduled basis (work with your ZOLL representative to enable this feature), you can still manually send the data at any time. Instructions to manually send the demographic file can be found at the end of the maintenance configurations section.
Important! - Demographic Sync Override: If you do not want to use the automatic synchronization from ZOLL emsCharts to RNDB for your crew member and/or vehicle demographic information (or you do not want the ZOLL emsCharts information to update/overwrite the RNDB information), you must contact ZOLL Support for assistance with disabling the demographic synchronization and make sure to read the "Important! - Demographic Sync Override" notes for crew members and units/vehicles below.
Crew members
Go here for instructions on adding or updating your ZOLL emsCharts crew members.
When new crew members are added to your service or existing crew members are updated, the data will be transferred to RNDB via the demographic file sent from ZOLL emsCharts. When the demographic file is sent to RNDB, the interface will try to match the crew member data in the demographic file with the existing crew member records in the RNDB system. A new record will be created for the crew member in RNDB if a match is not found.
There are three pieces of information used, in order, to try to match to an existing record:
-
ZOLL emsCharts unique crew member ID (UUID): A unique, internal ZOLL emsCharts ID automatically generated for each crew member. Only RescueNet crew member records that have already been matched to a ZOLL emsCharts crew member will have a UUID.
Note: This hidden UUID matching option is different than #2 below and will be the first matching criteria used even if using UUID for #2.
-
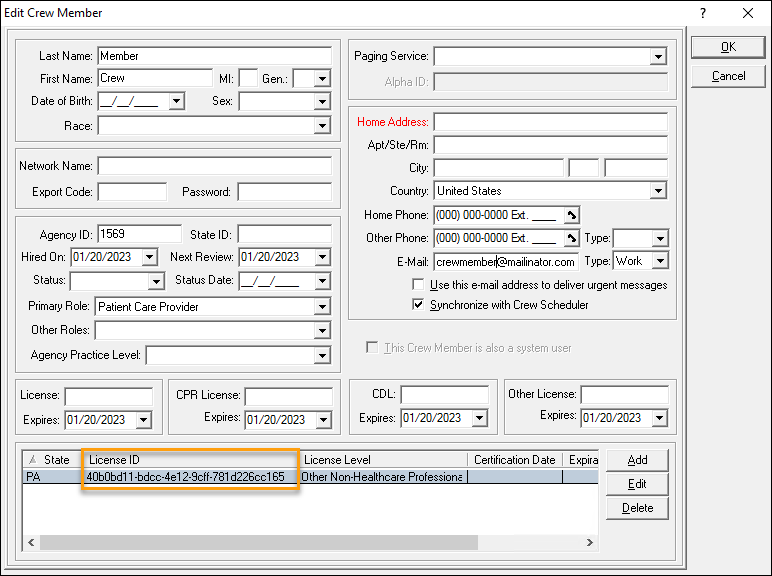
Crew member state license ID: The license ID provided to the crew members from the state of your Service's headquarters.
-
You can use the crew member UUID in place of the state license ID. This is a good alternative for Service's who have a lot of crew members who do not have a state license or have a license in a state other than the Service's home state.
-
-
Crew member first + last name: Matching based on name is not case sensitive. If duplicates exist, middle initial and date of birth will be used if they are included in the NEMSIS file sent from ZOLL emsCharts to RNDB.
Notes:
-
Best practice is to configure the crew member state license ID (or use UUID) for matching purposes rather than rely on name matching.
-
Crew member records in RNDB that have been disabled or deleted are included in the match search.
-
If a match is made on a disabled or deleted crew member, the record will be re-enabled in RNDB.
-
If a match is found, all information in RNDB will be overwritten with the information coming from ZOLL emsCharts.
-
If no matches are found in RNDB, a new crew member will be created and assigned to the company in the NEMSIS file sent from ZOLL emsCharts.
Important! - Demographic Sync Override: If you do not want to synchronize your ZOLL emsCharts crew members to your RescueNet system, ZOLL Support must disable the sync and you will need to configure the crew members in both ZOLL emsCharts and RNDB/RN ePCR.
You must add a matching state license in both systems for each crew member even if they do not have a state issued license (you can make one up). The state license must be for the service's home state found in ZOLL emsCharts Web Service Configuration > General tab.
Click here for instructions on adding the crew members and state IDs in RescueNet. For more general information on configuring crew members in RescueNet, see the RescueNet Billing Admin Guide and the RescueNet ePCR Admin Guide on the ZOLL Community Documentation page.
Units/vehicles
Unit information from ZOLL emsCharts ('Units' code table and 'Unit Tail / Registration' code table) is transferred to RNDB as vehicles. When the demographic file is sent to RNDB, the interface will try to match the unit data from the ZOLL emsCharts demographic file with the existing vehicle records in the RNDB system. The Sanitas/RescueNet Vehicle ID field in ZOLL emsCharts is used as the unique vehicle ID (vehicle name) to search for in RNDB. This field has a maximum limit of six characters to match the RNDB vehicle ID limitation of six characters.
Values from both the ZOLL emsCharts 'Units' code table and the 'Unit Tail / Registration' code table will be used to search for a matching record in RNDB. If no match is found, a new vehicle record will be created in RescueNet.
Important! For Services using a call sign or unit name that is different from the physical vehicle, enter your call sign in the 'Units' code table and then enter your physical unit in the 'Unit Tail / Registration' code table. Make sure to select a 'Corresponding Unit' to associate the 'Unit Tail / Registration' value with a 'Unit' value to prevent duplicate vehicles from being created in RescueNet.
Go here for instructions on adding or updating your ZOLL emsCharts Units.
Notes:
-
The Sanitas/RescueNet Vehicle ID field will only display in the Units code table if the Export Billing Package field is set to 'Sanitas' in the Chart Summary Setup code table. This is covered in step 6 of the initial configurations section.
-
If an existing vehicle is found in RNDB during the import, the details will be updated, but the status will remain the same, regardless if it is enabled or disabled.
-
If no matching vehicle is found in RNDB during the import, a new vehicle will be created in RNDB for the company associated with the import.
-
The 'Local ID' field in the ZOLL emsCharts 'Units' code table is populated into the vehicle's Description field in RNDB.
-
Similarly, the 'Tail / Reg#' field in the ZOLL emsCharts 'Unit Tail / Registration' code table is populated into the vehicle's Description field in RNDB if it is exactly 17 characters long (length of valid VIN). If it is not exactly 17 characters, it will be left out of the demographic file and the vehicle's Description field in RNDB will be blank.
-
-
If you use RescueNet Dispatch as your integrated CAD solution and the Copy CAD Mappings feature is enabled, under Configuration > CAD Mappings > Units and Unit Tail / Registration you can click the COPY TO BILLING button to copy the CAD ID values into the corresponding RescueNet Billing ID field.
-
The field in the 'Units' code table that the CAD ID will be copied to is labeled "RescueNet Billing/Sanitas Vehicle ID".
-
The field in the 'Unit Tail / Registration' code table that the CAD ID will be copied to is labeled "RescueNet Billing ID".
-
Work with your ZOLL representative to enable the Copy CAD Mappings feature.
-
Important! - Demographic Sync Override: If you do not want to transfer your ZOLL emsCharts vehicles to your RescueNet system, ZOLL Support must disable the sync and you will need to configure the vehicles in both ZOLL emsCharts and RNDB/RN ePCR.
You must add a matching state license in both systems for each vehicle even if they do not have a valid state issued license (you can make one up). The state license must be for the service's home state found in ZOLL emsCharts Web Service Configuration > General tab.
Click here for instructions on adding the vehicles and state IDs in RescueNet. For more general information on configuring vehicles in RescueNet, see the RescueNet Billing Admin Guide and the RescueNet ePCR Admin Guide on the ZOLL Community Documentation page.
Facilities
ZOLL emsCharts divides facilities into two separate categories each with their own master list: facilities that offer health care services and are typically issued state IDs (like hospitals), and all other types of locations that may be used for pick-up or drop-off (like personal residences, gas stations, and stores). ZOLL emsCharts facilities that offer health care services are part of the hospitals master list, and facilities that do not offer health care are part of the common addresses master list. RNDB has only one facilities master list for all facility types, including those without state IDs.
Because of the differences with how the two systems store facility lists, there are some additional steps for setting up facilities to import from ZOLL emsCharts into RNDB. We will split these steps up into two sections: common addresses and hospitals.
Common addresses
-
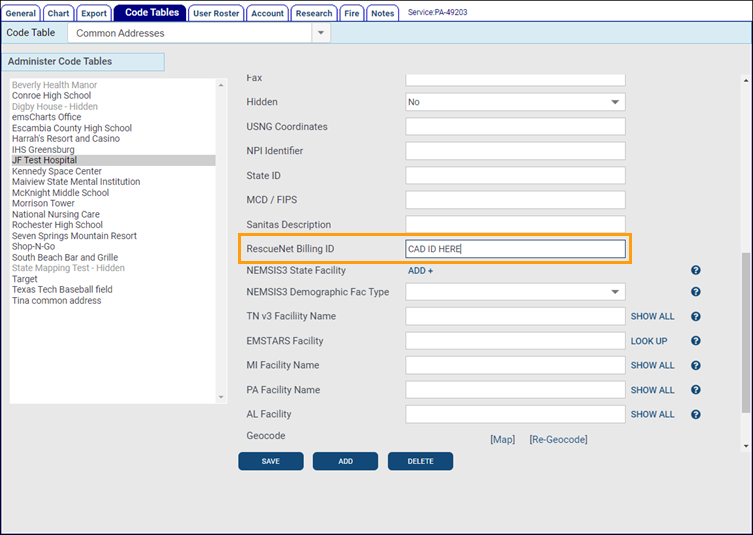
Add the facility to the common addresses list in ZOLL emsCharts.
Note: If you use RescueNet Dispatch as your integrated CAD solution and the Copy CAD Mappings feature is enabled, under Configuration > CAD Mappings > Common Addresses you can click the COPY TO BILLING button to copy the CAD ID values into the 'RescueNet Billing ID' field. If you use this option, you will only have to complete steps a-c for addresses that do not have a CAD ID in CAD Mappings. Work with your ZOLL representative to enable this option.
-
Go to Service Configuration > Code Tables > Common Addresses.
-
Click ADD for a blank set of fields.
Note: Facilities already saved to your Common Addresses list will show up on the left. You can select them to review and update their information.
-
Enter the name, RescueNet Billing ID, and any other desired information. Click SAVE.
-
Hospitals
Although many of the steps are very similar, configuring hospitals uses a different ZOLL emsCharts code table and there are some additional steps for setting up hospitals that are not done for common addresses.
-
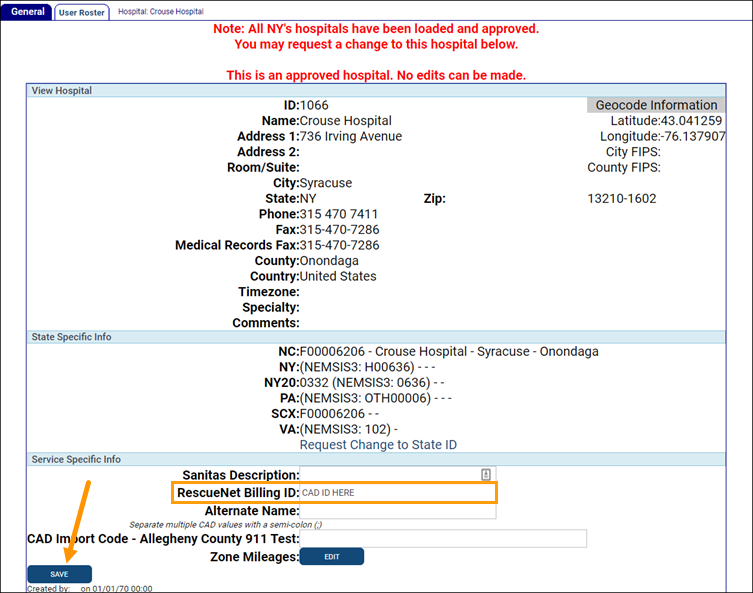
Add the RescueNet Billing ID for your hospitals in ZOLL emsCharts.
Note: If you use RescueNet Dispatch as your integrated CAD solution and the Copy CAD Mappings feature is enabled, under Configuration > CAD Mappings > Common Addresses you can click the COPY TO BILLING button to copy the CAD ID values into the 'RescueNet Billing ID' field. If you use this option, you will only have to complete steps a-c for addresses that do not have a CAD ID in CAD Mappings. Work with your ZOLL representative to enable this option.
-
Go to Service Configuration > Hospitals.
-
Click SEARCH FOR HOSPITAL.
-
Enter the name of the hospital and select the state where it's located then click SEARCH
Note: The % symbol can be used as a wildcard for searching.
-
Select the appropriate hospital from the results and click SAVE.
-
On the General tab of the hospital in the Service Specific Info section, enter the RescueNet Billing ID and click SAVE .
-
-
Add each hospital to the default referring or default receiving hospitals list in ZOLL emsCharts. You don't have to add each hospital to both lists, but each hospital must be part of at least one of the lists to be sent to RNDB during the import.
-
Default Referring Hospitals
-
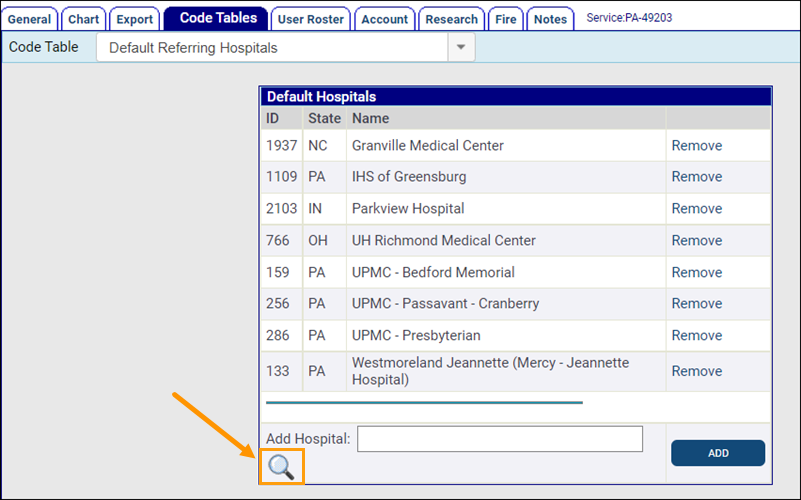
Go to Service Configuration > Code Tables > Default Referring Hospitals.
-
Click the magnifying glass icon to open a window where you can search for hospitals using the name and state.
-
After searching and finding the hospital, click the radial button next to the hospital to select it and click SAVE.
-
Click ADD to finish adding it to the default referring hospitals list.
-
-
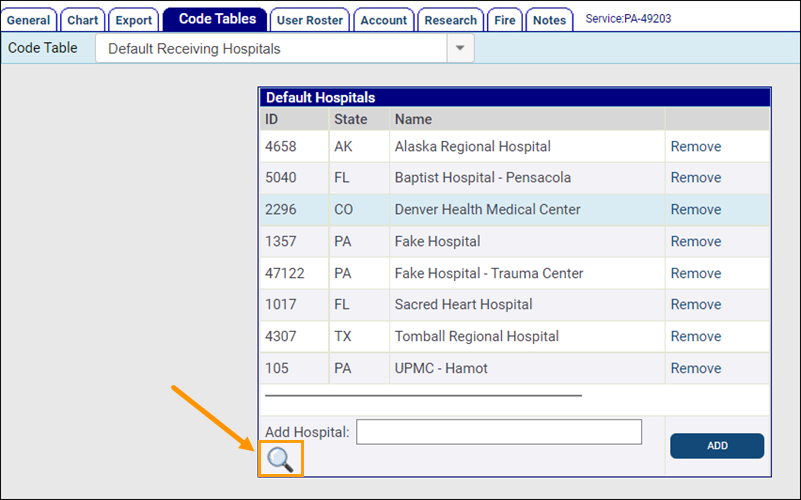
Default Receiving Hospitals
-
Go to Service Configuration > Code Tables > Default Receiving Hospitals.
-
Click the magnifying glass icon to open a window where you can search for hospitals using the name and state.
-
After searching and finding the hospital, click the radial button next to the hospital to select it and click SAVE.
-
Click ADD to finish adding it to the default referring hospitals list.
-
-
Demographic transfer
Important! - Demographic Sync Override A demographic file must be sent from ZOLL emsCharts to RNDB after completing the maintenance configurations initially and any time they are updated. Failure to send the demographic file after updating hospitals and common addresses, crew member, or unit/vehicle information will lead to missing or outdated information in RNDB and can cause import failures.
If you do not want to use to the automatic synchronization from ZOLL emsCharts to RNDB for your crew member and/or vehicle demographic information (or you do not want the ZOLL emsCharts information to update/overwrite the RNDB information), you must contact ZOLL Support for assistance with disabling the demographic synchronization and make sure to read the "Important! - Demographic Sync Override" notes for crew members and units/vehicles above in the maintenance configurations section.
Go here for information on setting up your demographics in ZOLL emsCharts.
Your system can be configured to automatically check for demographic updates and send them to RNDB on a scheduled basis. Please work with your ZOLL representative to enable this feature for your Service. Important!You must still manually send an eDistribution update in RescueNet after your demographic changes have been sent, regardless whether the demographic data is sent automatically or manually.
To send your demographic data manually:
-
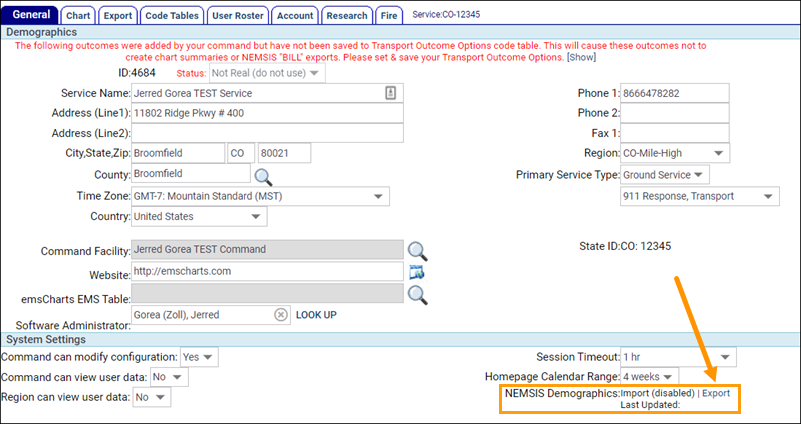
In ZOLL emsCharts, go to Service Configuration > General and under the System Settings section, click Export next to NEMSIS Demographics.
-
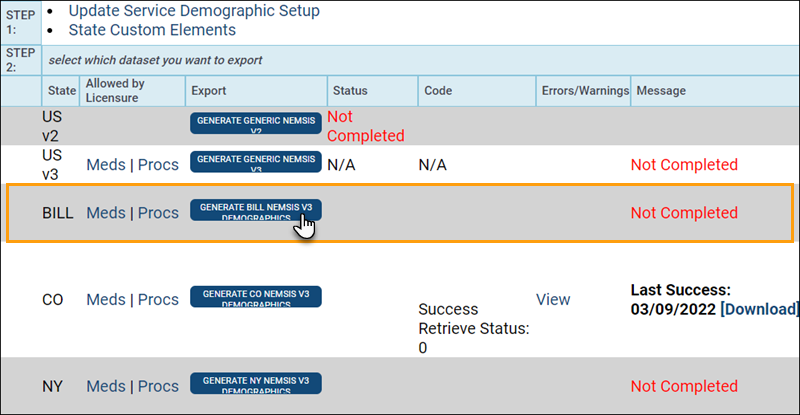
Find the BILL export and click GENERATE BILL NEMSIS V3 DEMOGRAPHICS. A status will be returned to indicate whether it was successful or if there were any errors. XSD errors are the only type that will prevent the demographic file from generating successfully, but it is still good to review and address any schematron errors or warnings to ensure all your data is sent to RNDB.
Note: The RescueNet Import Web Service will save detailed logging for import results of the data received by ZOLL emsCharts. You can find the log file on the web server hosting the RescueNet Import Web Service under C:\ProgramData\ZOLL Data Systems\Logs\NEMSISDemographicImportResult[current date/time].txt.
-
Once you have successfully sent the demographics information to RNDB, you need to send out one more eDistribution update in RescueNet. This can be done on a RN admin workstation using either ZOLL Data Management Console (ZDMC) or Field Data Administration (FD Admin). You only have to use one of the two methods below to update the data in RNDB.
ZDMC
-
On your RN admin workstation, launch ZDMC.
-
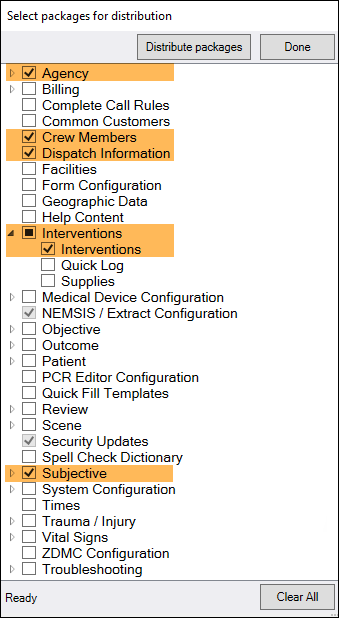
In the top toolbar, go to Tools > Distribute Packages.
-
-
Agency
-
Crew Members
-
Dispatch Information
-
Interventions > Interventions
-
Subjective
-
-
You can now close ZDMC.
FD Admin
-
Patient encounter data transfer
Once the setup is complete, any time a chart is closed and reaches the configured QA level, the chart data will be sent to RescueNet Billing.
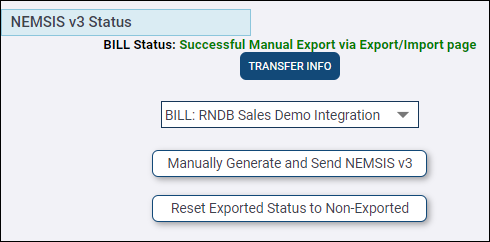
The NEMSIS v3 Status section on Page 9 of the charts will show the BILL status of the chart so you know if it has been successfully exported to RNDB. Clicking on TRANSFER INFO will display the full list of errors and warnings, if any. The button labeled 'Manually Generate and Send NEMSIS v3' in the status section can be used to manually export the data to RNDB by selecting the BILL option for your RNDB system from the drop-down.
Note: When viewing errors and warnings using the TRANSFER INFO Button, all errors and warnings that have ever existed for the chart will be displayed even if they have been fixed so it is important to keep track of which ones you have addressed.
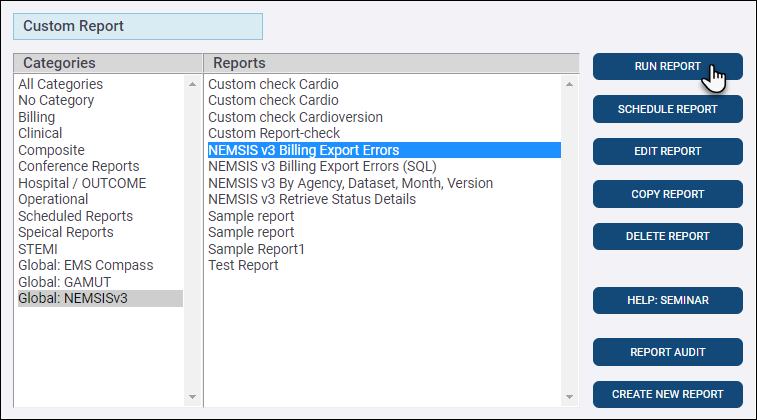
To see a summary of all billing export errors for all charts, go to Reports > Custom Reports > Global: NEMSISv3, select the 'NEMSIS v3 Billing Export Errors' report, and click RUN REPORT.
The results will show a list of errors that occurred for any NEMSIS 3.4 BILL transfer attempts for the service. The results contain any records attempted to be transferred within the last 30 days - it is not based on date of service or other timestamp within the charts.
Run a test call and view it in RescueNet Billing
-
Either dispatch a call from your CAD system or create a new chart manually in ZOLL emsCharts.
-
Complete the chart and either wait until it advances naturally to the QA level setup to export to billing, or go to Page 9, use the drop-down in the NEMSIS v3 Status section to select your BILL web service, and click Manually Generate and Send NEMSIS v3.
-
Check the status message and address any errors if any occurred. Resend if necessary after errors have been cleared until the chart sends successfully.
-
On a RescueNet Billing workstation, launch RNDB.
-
In the top toolbar go to Trip > Find and search for the chart you completed in ZOLL emsCharts. In the Search Results window, double-click the trip for your chart to open it in Call Taking.
Notes:
-
If you use RescueNet Dispatch for your CAD system, the run number for the chart will be the same as the run number for the trip in RNDB. If you use a different CAD system or manually create charts in ZOLL emsCharts, the run number from your chart will be the incident number for the trip in RNDB.
-
To view the trip in Billing Pro (if installed), once you have the trip open in Call Taking, press Shift+F1 on your keyboard, or, in the top toolbar go to Desktop > Tools > RescueNet Billing Pro 3.0.
-
-
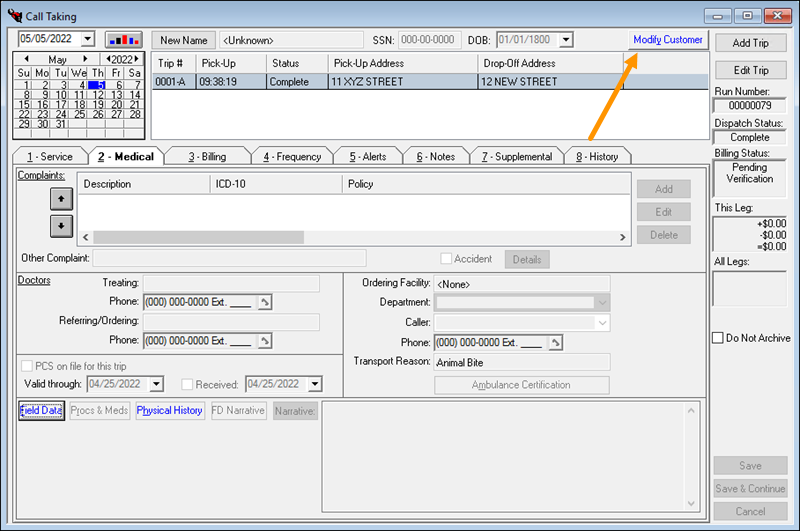
If the Modify Customer button is blue, this indicates there is existing patient data in RNDB that needs to be reconciled with the patient data imported for the trip from emsCharts.
Notes: The settings on the Customer Confirmation tab in RescueNet Administration > Field Data > Field Data Administration > Import Configuration > Import Options control the conditions requiring patient data reconciliation.
-
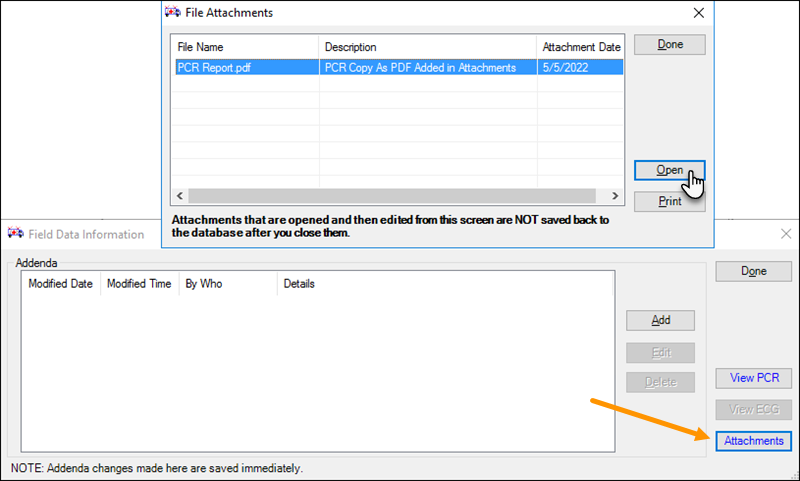
To view the chart, go to 2 - Medical > Field Data > Attachments and the chart will be listed as "PCR Report.pdf". Select it and click Open to view it.
Note: The View PCR button will open a copy of the chart but may not contain all of the chart data so it is recommended to use the copy under Attachments.
Congratulations!
You have successfully setup the ZOLL emsCharts RescueNet Billing Interface and sent a test chart through to billing. Any time a chart is closed and reaches the configured QA level, the chart data will be sent to RescueNet Billing.
Search the ZOLL Community for Knowledge Base Articles to help troubleshoot any errors you might run into, and contact ZOLL Support if you need further assistance.
Latest interface updates
December 2022
The following fixes and new features or enhancements have been added in the latest version of the interface:
-
Exam assessment fix: We fixed an issue that would sometimes cause exam assessments to fail to send from ZOLL emsCharts to RescueNet Billing.
-
PCR data: Two additional pieces of data captured in ZOLL emsCharts will now be included in the PCRs sent to RescueNet Billing.
-
Electronic crew signatures.
-
GCS Scores from Page 3.
Note: Command Facility Configuration > Chart > Page 3 > Initial GCS must be set to 'Yes'.
-
-
Automatic demographic updates: When demographic data (crew members, units, and common addresses and hospitals) is updated in ZOLL emsCharts, it will be automatically sent to RescueNet.
-
Work with your ZOLL representative to enable this feature.
-
-
Crew members without home state license: You can now sync crew members without a state license in your Service's "home" state, and crew members who do not have a license at all.
-
This feature will use an automatically generated unique ID (UUID) for each crew member in your Service.
-
The UUID will be used in place of the crew members state license ID in the RescueNet system.
-
When this feature is enabled, the UUID will be used for matching for all of your Service's crew members. You cannot turn it on for some crew members but not others.
-
Work with your ZOLL representative to enable this feature.
-
-
'Units' and 'Unit Tail / Registration' values sync: Vehicles in RescueNet will now sync with records from both your ZOLL emsCharts 'Units' code table and the 'Unit Tail / Registration' code table. Any values you add into either the 'Units' or the 'Unit Tail / Registration' code tables will search for a matching record in RescueNet. If one is not found, a new vehicle will be created, just like with crew members and common addresses and hospitals.
Important! If you are using both 'Units' and 'Unit Tail / Registration' for your PCRs, we recommend selecting a 'Corresponding Unit' to associate the 'Unit Tail / Registration' value with a 'Unit' value to prevent duplicate vehicles from being created in RescueNet.
-
Copy CAD Mappings for Billing: For Services using RescueNet Dispatch integrated with ZOLL emsCharts, you now have the option to copy your existing CAD Mappings to save time and avoid duplicate data entry.
-
When viewing the 'Common Addresses' or 'Unit Tail / Registration' CAD Mappings in ZOLL emsCharts, you will see a COPY TO BILLING button. This will take the CAD ID you have entered for each value in that category, and copy it into the 'RescueNet/Sanitas Billing ID' field for each entry.
Note: The 'RescueNet/Sanitas Billing ID' field is not found in the CAD Mappings. It is found for each individual 'Unit Tail / Registration' value and each Hospital or Common Address in their code table or other configuration location.
-
Work with your ZOLL representative to enable this feature.
-
